Introduction
I have been studying Deep Learning for a while and thought I would try it out in my field of interest. I like astronomy and am particularly interested in stellar evolution, the formation of elements, and galaxy formation and evolution. I tried to classify the shape of galaxies, which seemed to be relatively easy to do.
Sources
- astroNN Page found by looking for galaxy images and teacher data to perform shape classification. I decided to use the Galaxy10 DECals Dataset found in DATASETS on this page.
This data was described on this page as a toy dataset.The one mentioned as toy dataset was the Galaxy10 SDSS Dataset. In any case, thanks to the efforts of many predecessors to create this data. - Galileo of Effort I thought about basing the CNN implementation on the code I learned in Udemy before, but in the end I referred to this page for the framework of the code.
- VGG16 As for the CNN architecture, I decided to try the VGG16 model first to trace its history. I decided to try the VGG16 model first as a CNN architecture, and referred to this page.
- ResNet As the next model, I decided to use ResNet and referred to this page.
As you can see from the above reference page, I used the CNN model, so what I actually worked on was the part related to data creation. As for my own environment, I used JupyterLab’s Singularity image running Pytorch on Ubuntu + GPU.
Dataset Creation
This was the hardest part of this challenge. So far, I have studied CNN using MNIST, which is ready-made data, but I struggled to create Dataset and DataLoader from image data by myself.
Specifically, I created a subclass to create a Dataset and split the dataset using torch.utils.data.rondom_split for training and testing, and I could not figure out how to use different transforms for each for training and testing.
The Galaxy10 DECals Dataset that we used this time was a collection of image data for each of the 10 classes. Therefore, I randomly shuffled the order of the image data to separate them for training and testing.
# Galaxy10のデータを読み込み、シャッフルしたのち、訓練用とテスト用に分ける

import h5py
import numpy as np
import random

with h5py.File('../20221214_galaxy/galaxy10/Galaxy10_DECals.h5', 'r') as F:
    images = np.array(F['images'])
    labels = np.array(F['ans'])

galaxys = images.shape[0]  # 銀河データの数
train_size = int(0.8 * galaxys)
test_size = galaxys - train_size

train_indices = []
test_indices = []
for i in range(galaxys):
    idx = random.randint(0, galaxys-1)
    if i < train_size:
        train_indices.append(idx)
    else:
        test_indices.append(idx)
import torch
from torch.utils.data import Dataset
from torch.utils.data import DataLoader
import torchvision
import torchvision.transforms as transforms
from typing import List, Tuple
from PIL import Image

class GalaDataset(Dataset):
    def __init__(self, images:np.ndarray, labels:np.ndarray, indices:list, transforms) -> None:
        super().__init__()
        self.images = images  # 読み込んだ全ての銀河イメージ
        self.labels = labels
        self.indices = indices  # 訓練用/テスト用を切り分けるため、読み込んだ銀河のインデックスを格納
        self.transforms = transforms

    def __getitem__(self, index: int) -> Tuple[torch.Tensor, torch.Tensor]:
        idx = self.indices[index]  # 読み込んだ銀河データのインデックスを得る
        image = self.images[idx]
        image = Image.fromarray(image)
        label = self.labels[idx]
        # apply transforms
        if self.transforms is not None:
            image = self.transforms(image)
        return (image, label)

    def __len__(self) -> int:
        return len(self.indices)  # 訓練用/テスト用でサイズは別なことに注意
I had a little trouble getting to the above Dataset subclass called GalaDataset. If you create instances of this GalaDataset for training and testing, you can have two datasets without having to copy the image data.
train_transforms = transforms.Compose([
    transforms.CenterCrop(224),
#    transforms.RandomRotation(degrees=[-30, 30]),
#   transforms.RandomHorizontalFlip(p=0.3),
    transforms.ToTensor(),
])

test_transforms = transforms.Compose([
    transforms.CenterCrop(224),
    transforms.ToTensor(),
])

# 訓練用とテスト用のDatasetを上記で定義したクラスから作成
train_dataset = GalaDataset(images=images, labels=labels,
                            indices=train_indices,transforms=train_transforms)

test_dataset = GalaDataset(images=images, labels=labels,
                            indices=test_indices,transforms=test_transforms)
The reason I wanted to separate the Dataset for training and testing is that I wanted to apply transforms such as rotate, flip left/right, etc. (the part commented out) to the training version.
# DataLoaderを作成
batch_size = 32
train_loader = DataLoader(train_dataset, batch_size=batch_size, shuffle=True)
test_loader = DataLoader(test_dataset, batch_size=batch_size, shuffle=True)
Now that the DataLoader has been created, then I create the model and train and evalute it.
VGG16 model
import torch.nn as nn
import torch.nn.functional as F
import torch.optim as optim

class Net(nn.Module):
    def __init__(self):
        super().__init__()

        self.conv01 = nn.Conv2d(3, 64, 3)
        self.conv02 = nn.Conv2d(64, 64, 3)
        self.pool1 = nn.MaxPool2d(2, 2)

        self.conv03 = nn.Conv2d(64, 128, 3)
        self.conv04 = nn.Conv2d(128, 128, 3)
        self.pool2 = nn.MaxPool2d(2, 2)

        self.conv05 = nn.Conv2d(128, 256, 3)
        self.conv06 = nn.Conv2d(256, 256, 3)
        self.conv07 = nn.Conv2d(256, 256, 3)
        self.pool3 = nn.MaxPool2d(2, 2)

        self.conv08 = nn.Conv2d(256, 512, 3)
        self.conv09 = nn.Conv2d(512, 512, 3)
        self.conv10 = nn.Conv2d(512, 512, 3)
        self.pool4 = nn.MaxPool2d(2, 2)

        self.conv11 = nn.Conv2d(512, 512, 3)
        self.conv12 = nn.Conv2d(512, 512, 3)
        self.conv13 = nn.Conv2d(512, 512, 3)
        self.pool5 = nn.MaxPool2d(2, 2)

        self.avepool1 = nn.AdaptiveAvgPool2d((7, 7))

        self.fc1 = nn.Linear(512 * 7 * 7, 4096)
        self.fc2 = nn.Linear(4096, 4096)
        self.fc3 = nn.Linear(4096, 10)

        self.dropout1 = nn.Dropout(0.5)
        self.dropout2 = nn.Dropout(0.5)


    def forward(self, x):
        x = F.relu(self.conv01(x))
        x = F.relu(self.conv02(x))
        x = self.pool1(x)

        x = F.relu(self.conv03(x))
        x = F.relu(self.conv04(x))
        x = self.pool2(x)

        x = F.relu(self.conv05(x))
        x = F.relu(self.conv06(x))
        x = F.relu(self.conv07(x))
        x = self.pool3(x)

        x = F.relu(self.conv08(x))
        x = F.relu(self.conv09(x))
        x = F.relu(self.conv10(x))
        x = self.pool4(x)

        x = F.relu(self.conv11(x))
        x = F.relu(self.conv12(x))
        x = F.relu(self.conv13(x))
        x = self.pool5(x)

        x = self.avepool1(x)

        # 行列をベクトルに変換
        x = x.view(-1, 512 * 7 * 7)

        x = F.relu(self.fc1(x))
        x = self.dropout1(x)
        x = F.relu(self.fc2(x))
        x = self.dropout2(x)
        x = self.fc3(x)

        return x
The last part of the fully-connected layer, the reference was a 5-class classification, but this time it is a 10-class classification, so it was changed to 10.
Training and Testing functions
# 損失関数の設定
criterion = nn.CrossEntropyLoss()

# 最適化手法を設定
optimizer = optim.Adam(model.parameters())
Training function
def train_epoch(model, optimizer, criterion, dataloader, device):
    train_loss = 0
    model.train()
    for i, (images, labels) in enumerate(dataloader):
        images, labels = images.to(device), labels.to(device)
        optimizer.zero_grad()
        outputs = model(images)
        loss = criterion(outputs, labels)
        loss.backward()
        optimizer.step()
        train_loss += loss.item()
    train_loss = train_loss / len(train_loader.dataset)
    return train_loss
Infurence function
def inference(model, optimizer, criterion, dataloader, device):
    model.eval()
    test_loss=0

    with torch.no_grad():
        for i, (images, labels) in enumerate(dataloader):
            images, labels = images.to(device), labels.to(device)
            outputs = model(images)
            loss = criterion(outputs, labels)
            test_loss += loss.item()
        test_loss = test_loss / len(test_loader.dataset)
    return test_loss
Function to execute a specified number of ephocs.
def run(num_epochs, optimizer, criterion, device):
    train_loss_list = []
    test_loss_list = []
    for epoch in range(num_epochs):
        train_loss = train_epoch(model, optimizer, criterion, train_loader, device)
        test_loss = inference(model, optimizer, criterion, test_loader, device)

        print(f'Epoch [{epoch+1}], train_Loss : {train_loss:.4f}, test_Loss : {test_loss:.4f}')
        train_loss_list.append(train_loss)
        test_loss_list.append(test_loss)
    return train_loss_list, test_loss_list
Execution
# 訓練時間を測定:開始

import time
import datetime

dt_now = datetime.datetime.now()
print("*** Started the Timer at {} ***".format(dt_now))
start_time = time.time()  # 実行時間計測開始
train_loss_list, test_loss_list = run(30, optimizer, criterion, device)
# 訓練時間測定:終了

lapse_time = time.time() - start_time
print("-" * 80)
print("実行時間 {:8.1f}秒".format(lapse_time))
print("-" * 80)
dt_now = datetime.datetime.now()
print("*** Stopped the Timer at {} ***".format(dt_now))
Graphing
import matplotlib.pyplot as plt

num_epochs=30
fig, ax = plt.subplots(figsize=(8, 6), dpi=100)
ax.plot(range(num_epochs), train_loss_list, c='b', label='train loss')
ax.plot(range(num_epochs), test_loss_list, c='r', label='test loss')
ax.set_xlabel('epoch', fontsize='20')
ax.set_ylabel('loss', fontsize='20')
ax.set_title('training and test loss', fontsize='20')
ax.grid()
ax.legend(fontsize='25')
plt.show()
he resulting graph image is shown below.
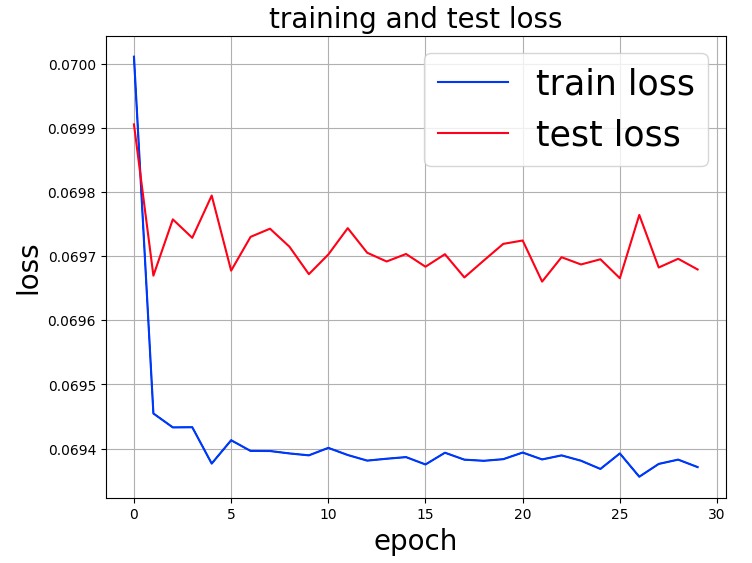
Both train loss and test loss do not improve even after repeating epochs. What could be the cause?
This article has become a bit long, so this is all for this issue. In next issue, I will summarize what I have tried regarding the previous question.
Translated with www.DeepL.com/Translator (free version)