Motivation
Astronomy is one of my hobbies, and I’ve always wanted to take my telescope to places with good stargazing conditions—places free from light pollution. Remote telescopes are the means to fulfill that dream. I recently learned about one such service, RicoRem(Ricoh’s remote telescope). I promptly became a member and captured NGC 300. I obtained monochrome images using LRGB filters. This post summarizes my experience up to synthesizing the monochrome images.
Related Information
- Ricoremo - A project launched from Ricoh’s new business creation program “TRIBUS”. It operates 50cm and 13cm telescopes at Siding Spring Observatory in Australia. Members can purchase points and make reservations to use these telescopes. After imaging, calibrated (dark/flat corrected) and raw images can be downloaded.
- Siril - Siril is an astronomical image processing tool. It is free software with features for processing astronomical images.
- ChatGPT - I used ChatGPT to select subjects and plan my observations. It suggests optimal observation times considering the moon phase and the subject’s meridian transit time. While many hobby astronomers plan using almanacs, I hadn’t observed in a while and used ChatGPT, which I frequently use for work. It’s surprisingly useful!
From Membership Registration to taking photos
Ricorem Membership Registration
Click “Register for Membership” on the Ricorimo page to proceed to the Login Page. Register for membership by clicking “Register here if you haven’t yet.”
Purchasing Points
From the “Purchase Points” tab on the Ricorimo member page, buy points. Since it was my first time, I started by purchasing 5,000 yen worth of points. For the time slot I photographed, using a 13cm telescope for about 30 minutes cost 4,500 points. I decided to try the 13cm first.
Target Selection
Since I prefer galaxy images, I chose a target from the southern sky’s galaxies. On November 8, 2025, I submitted the following prompt (original in Japanese) to ChatGPT:
From November 10th to 12th, please list five promising targets (especially galaxies) to observe at the following location and with the following equipment. Also state your reasons.
---
Location: Siding Spring Observatory, Australia.
Telescope: Takahashi TOA-130.
CCD: SBIG STX-16803ABG.
Note: The above is a remote telescope operated by Ricorem.
Responses for five candidates: NGC 253, NGC 300, NGC 55, NGC 1365, NGC 1316.
We decided to target the face-on NGC 300. Checking telescope availability, we set the observation date for November 11th and inquired about the time slot as follows.
What is the best time to photograph NGC 300 on November 11th?
Then, the following response (copied and pasted as is):
Tuesday, November 11 (AEDT, UTC+11) – Best Time to Photograph **NGC 300**

## Optimal Time Window

- **21:04 to 00:50**
   On this date, **civil twilight ends at 21:04**, and **moonrise is at 00:51**, so you can secure about 3 hours of **complete darkness & no moonlight**. [timeanddate.com](https://www.timeanddate.com/astronomy/@2149557)

## The Absolute Best “Core” Time

- **21:35 to 22:25 (Top Priority)**
   NGC 300 (RA≈00h54m, Dec≈−37°41′) passes **near the meridian** around this time, rising to **an altitude of about 84°** (calculated based on latitude −31°). This is the time when atmospheric mass is minimal, making it easiest to capture the faint outer extensions and contrast of the minute H II knots. Reference coordinates and size: **Approx. 22′ × 14′, V≈8–9 magnitude**. [astrodrudis.com+2astropixels.com+2](https://astrodrudis.com/ngc-300-caldwell-70/?utm_source=chatgpt.com)

## Note (Moon)

- **After 00:51, moonrise** will suddenly brighten the background. It's best to **finish broadband galaxy imaging by 00:50**. [timeanddate.com](https://www.timeanddate.com/astronomy/@2149557)

### Quick Tip (Assuming TOA-130 + STX-16803)

- Field of view ≈ 2.1°, scale ≈ 1.86″/px → **Single-frame capture comfortably covers the main body and outer edge**.
- For this night, **L 300–600s × multiple frames → RGB short exposure multiple frames** is stable. For faint outer regions, aim for a higher total exposure.
- Running the sequence **focus hunting → L core → RGB** around 9 PM is highly efficient.

If needed, I can also prepare a **minute-by-minute shooting sequence chart** tailored to this timeframe.
As evident from the response, it appears they searched related pages and compiled them to form the answer. They seem to be checking moonrise and moonset times from timeanddate. This allows planning observations without consulting an astronomical almanac. Where did they acquire the knowledge for the minor details in the latter part?
Shooting Reservation
The shooting reservation was made via the “Reservation Registration” section on the “Ricorimo Member Page”. I set the start time for 21:30. With 300-second exposures for each LRGB filter, it would take roughly 30 minutes, fitting within the points I had purchased. Since it was my first time, I operated cautiously, but the usability wasn’t bad.
The Shoot
When my scheduled time, 11/11 at 21:30, arrived, I got curious and checked the Operation Log and the All-Sky Camera, but couldn’t make much sense of it. The all-sky camera image was particularly bright, making me wonder, “Is this really the current sky?”
Worrying wouldn’t help, so I decided to wait for the results. This was a completely different experience from outdoor observation.
Images Arrive
The next day (11/12), I received an email from the “Ricoh Astro Photography Service” in the afternoon saying the captured images were ready for download, so I downloaded them.
Image Processing
Installing Siril
From the Siril homepage, select the version matching your OS environment. For macOS → Apple Silicon macOS, downloading siril-1.4.0-rc1-arm64.dmg will begin. Double-click to install. Open “Applications” and click “Siril” to launch it. The menus are also localized in Japanese.
Image Processing
Now, it’s time to use Siril to colorize the downloaded monochrome LRGB images. Since this is my first time using it, I’ll experiment by trial and error.
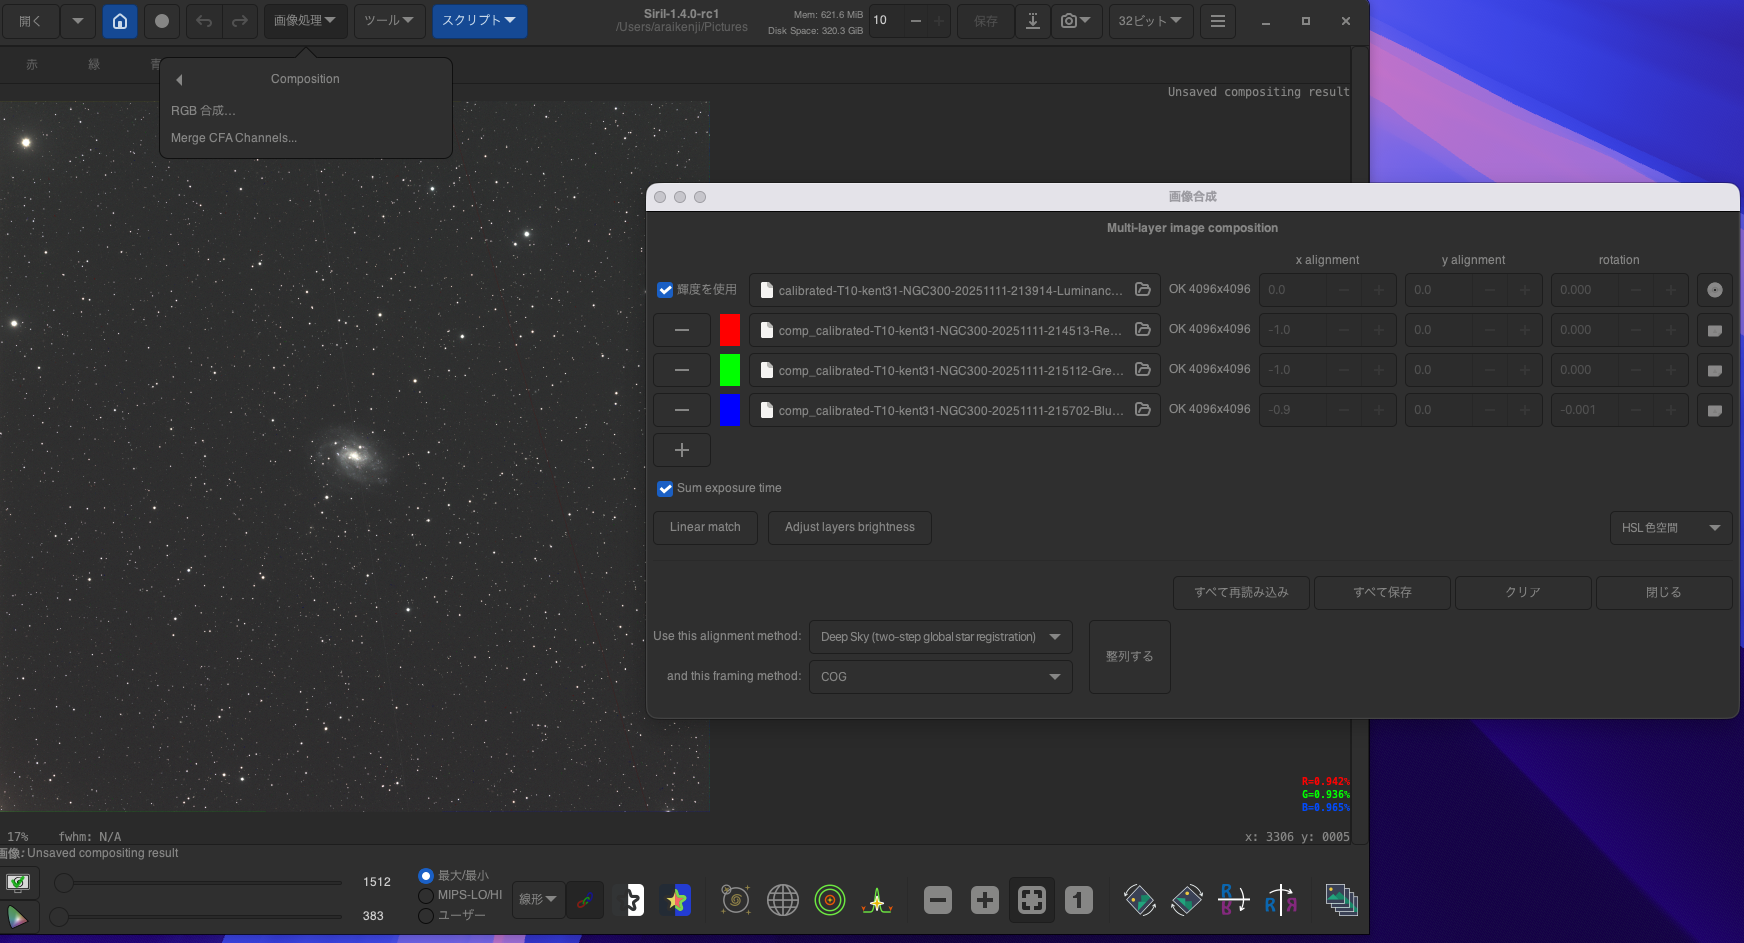
After launching Siril, select “Image Processing” → ‘Composition’ → “RGB Composition…” to access the image composition screen.

Select the images corresponding to LRGB. Click “Align” below “Image Composition,” and the galaxy (NGC 300) will emerge as shown below.
Click the “↓” icon at the top right of “Siril” to fit the image and save it in PNG format. The PNG format is for uploading to this article.
Next, select “Image Processing” → ‘Stretches’ → “Histogram Transformation…”.
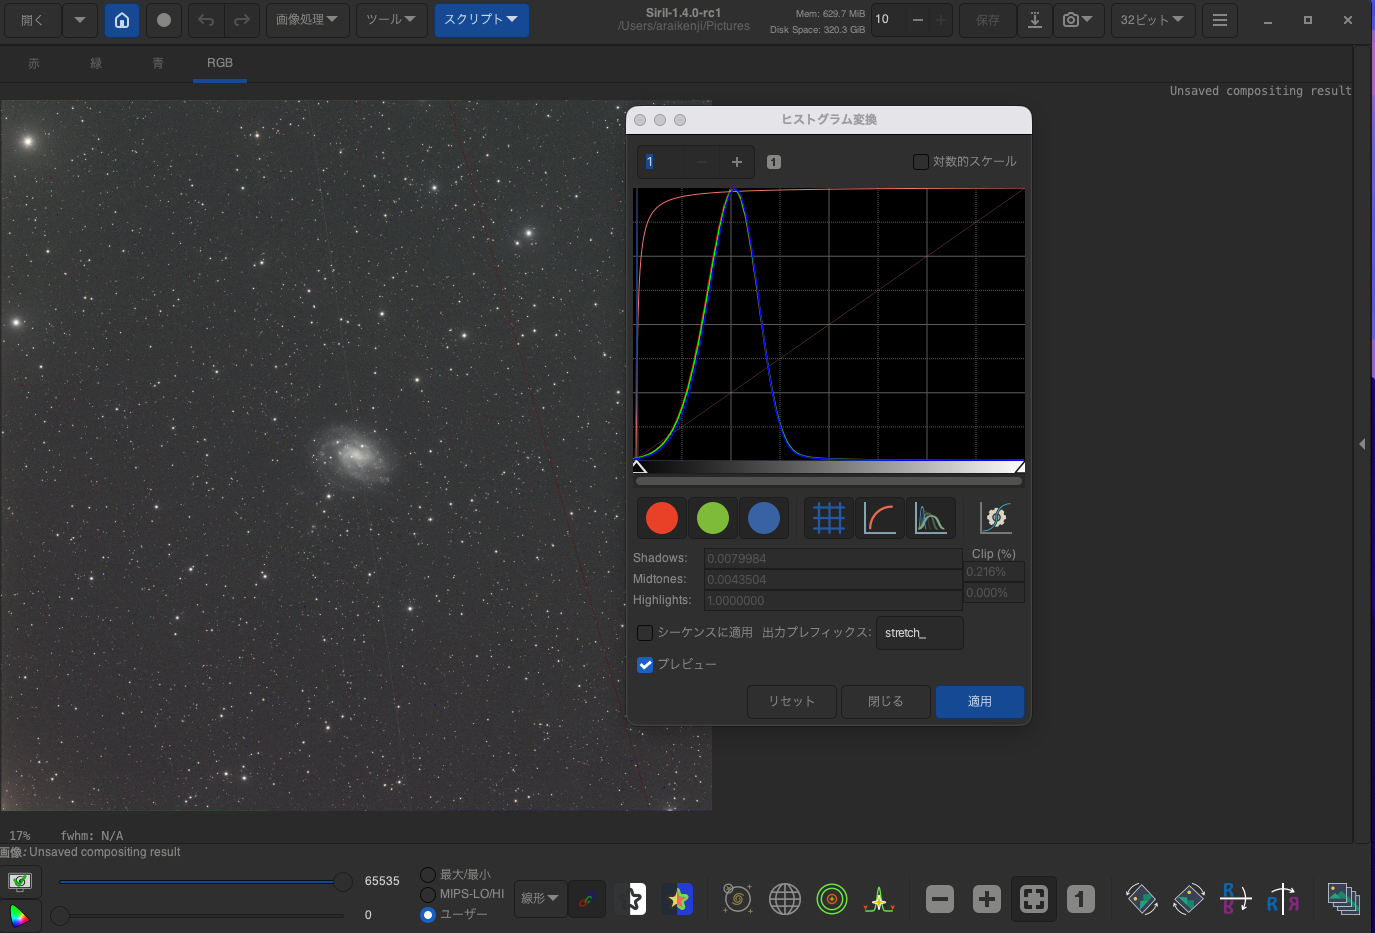
In the “Histogram Transformation” window, click the gear-like icon at the far right of the icons, then click “Apply” to finish!? (Probably)
After that, click the “↓” icon at the top right of “Siril” to fit the image and save it in PNG format. The PNG format is for uploading to this article.
NGC 300
I mentioned saving it above, but actually, after this, I cropped around the galaxy. I set the cropping ratio to 3:2 and cropped within that range. The resulting image is shown below.
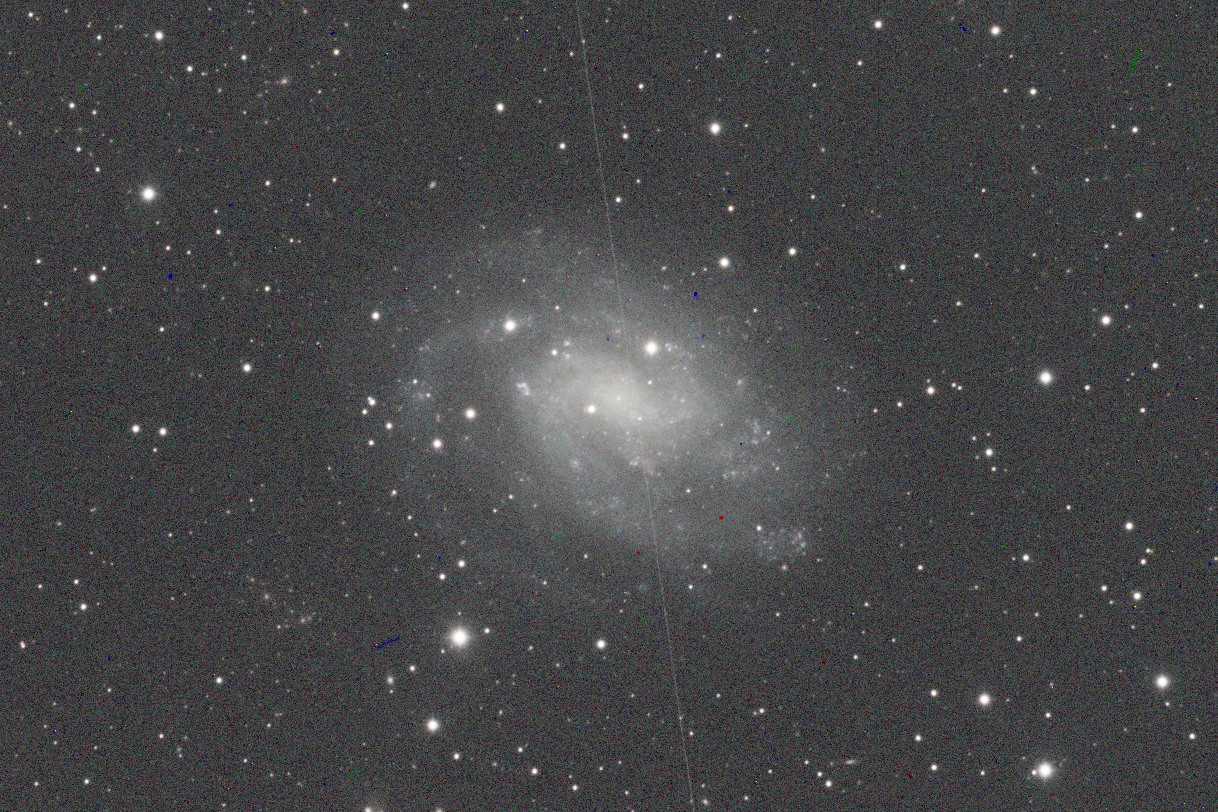
A satellite is visible in the L image. Actually, a satellite was also visible in the R image, but it was outside the clipping range and thus not visible in this image.
Summary
It’s been ages since I last did any stargazing. There’s a lot I don’t understand about image processing. This time, I captured each LRGB image with a single 300-second exposure. After looking into it, it seems stacking multiple images is standard practice.
I also asked ChatGPT about this, as follows:
When taking astrophotography, which produces better image quality: a single 300-second exposure, or stacking multiple shorter exposures totaling 300 seconds? Please explain your reasoning.
I also asked about the relationship with binning as follows.
天体写真を撮影する場合において、1回で300秒露出した画像と、短い露出を複数回繰り返し合計300秒の露出した画像をスタッキングしたものと、どちらのほうが画像品質が良いですか?理由含めて教えて。
Here are some excerpts from the responses:
## 5. Summary

**Standard Setup for Broadband LRGB Galaxy Imaging with TOA-130 + STX-16803**

- **Binning**
  - L: **1×1 bin**
  - RGB: **2×2 bin**
- **Exposure Time (Guideline per Frame)**
  - L: **120–180 seconds** (assuming a dark site)
  - RGB: **180–240 seconds** (2×2 bin)
- **Total Exposure Time**
  - L: **2–4 hours**
  - RGB: **40–60 minutes or more per color**

Use this as your baseline, then adjust **“a bit longer” or “a bit shorter”** based on:

- Night sky brightness
- Target galaxy brightness (e.g., bright like NGC 253 or faint extragalactic objects)
- Actual histogram and saturation levels

This is the practical approach.

If you can **narrow down the target**, like asking “For NGC 300, what specific number of seconds × number of frames would be best?”, I can create a more detailed exposure plan (number of frames and order for L/R/G/B) considering that galaxy's magnitude and size.
I want to use this as a reference and try my hand at photographing another subject.