はじめに
先月、@ITの記事で、Stable Diffusionという画像生成系のAIソフトを初めて知った。画像生成系は結果が目に見えるので、インパクトがある。Stable Diffusionについては、該当の記事を読んでいただければと思う。
ここでは、Diffusersというライブラリを使って簡単にStable Diffusionを試せるjupyter-labを作成したので、紹介する。
情報源
- 本家のgithub 先ずは本家。
- 本家のブログ記事 公開時のブログ記事。
- Hugging FaceのStable Diffusionページ Hugging Faceはモデルを使用する際のトークンを得るため必須。
- Hugging FaceのDiffusersを使ったStable Diffusionに関するブログページ
- @ITの記事 自分が興味を持つきっかけとなった記事。
- @ITの連載2回目の記事 Hugging Faceへのサインアップとアクセストークンの取得方法が載っている。
構築手順
ゴール
今回、構築するのは、jupyter-labでStable Diffusionを試せる環境のsingularityイメージである。
以下、sifファイルを作成するためのdefファイルと実行結果を説明する。
実行環境
実行環境は、NVIDIA RTX A4000を搭載したHP Z820で、OSはUbuntu 20.04、Driver Versionは470.141.03である。singularityのバージョンは、3.9.5。
初めに、nvidia/cuda:11.8.0-cudnn8-devel-ubuntu20.04をdockerでpullしたところ、次のようなエラーとなったので、nvidia/cuda:11.3.1-base-ubuntu20.04を使うことにした。
docker: Error response from daemon: failed to create shim task: OCI runtime cre\
ate failed: runc create failed: unable to start container process: error during\
 container init: error running hook #0: error running hook: exit status 1, stdo\
ut: , stderr: Auto-detected mode as 'legacy'
nvidia-container-cli: requirement error: unsatisfied condition: cuda>=11.8, ple\
ase update your driver to a newer version, or use an earlier cuda container: un\
known.
原因は、このページのCUDAとDriverのバージョンの関係を見よ!
defファイル
この記事のdefファイルに少し手を加えた。
# Stable Diffusionをjupyterlabで試せる、singularityコンテナを作成する。

Bootstrap:	docker
FROM:	nvidia/cuda:11.3.1-base-ubuntu20.04

%post
	apt update -y && apt -y install python3 python3-pip \
		curl git tree unzip vim wget
	pip3 install --upgrade pip setuptools
	pip3 install torch torchvision torchaudio --extra-index-url https://download.pytorch.org/whl/cu113
        pip3 install jupyterlab matplotlib pandas scikit-learn seaborn \
                sympy pydotplus ipywidgets widgetsnbextension \
                janome torchtext tweepy gensim folium pytorch-transformers \
                spacy torchdata fugashi ipadic pytorch-lightning \
		transformers scipy ftfy diffusers

%runscript
        jupyter-lab --ip=0.0.0.0 --port=8888 --no-browser --NotebookApp.token='' --notebook-dir=/workdir
sifファイルの作成
前節で作成したdefファイルからsingularityコンテナイメージ(sifファイル)は、次のようにして作成する。ここで、def_pytorch-lab.defは上記defファイル、def_pytorch-lab.sifはbuildするコンテナイメージ。
$ sudo singularity build sd_pytorch-lab.sif sd_pytorch-lab.def
作成したsifファイルを実行時には、NVIDIA RTX A4000が使われるように、次のように環境変数をセットして呼び出している。ここで、${COMMON_AREA}は、nfsマウントしている領域。
export SINGULARITYENV_CUDA_VISIBLE_DEVICES=0
singularity run --nv --bind ${COMMON_AREA}/jupyterlab:/workdir ${COMMON_AREA}/sifs/sd_pytorch-lab.sif
実行結果
実行したjupyterlabのセルは、次の通り。
# https://huggingface.co/blog/stable_diffusion

import torch
from diffusers import StableDiffusionPipeline

YOUR_TOKEN='hf_xxxxxxxxxxxxxxxxxxxxxxxxxxxxxxxxx'

# get your token at https://huggingface.co/settings/tokens
pipe = StableDiffusionPipeline.from_pretrained("CompVis/stable-diffusion-v1-4", revision="fp16", torch_dtype=torch.float16, use_auth_token=YOUR_TOKEN)
pipe.to('cuda')

prompt = "beautifull castle, with green garden, photorealistic, 8k "

with torch.autocast('cuda'):
    image = pipe(prompt).images[0]

image
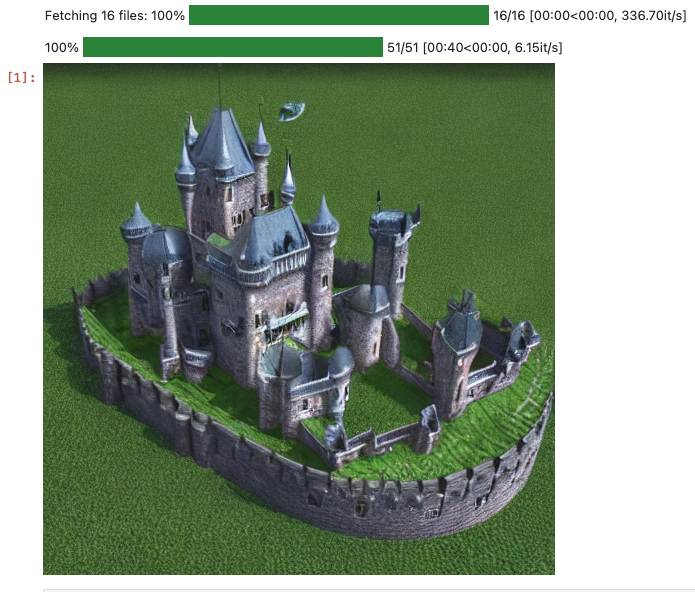
「beautifull castle, with green garden, photorealistic, 8k」との呪文で生成されたイメージは次の通り。
自分のイメージは、芝のグリーンではなく、森林の緑だったんだけど、呪文が良くなかったか!
まとめ
取り敢えず、自分の環境で生成モデルを使って、promptから画像の生成ができることが分かった。
diffusersを使わない方法も、試してみたい。