はじめに
2ヶ月前のこの投稿では、2次元円柱の周りの層流(Laminar Flow)について、ST formとVP formの各々の支配方程式を使って、シミュレーションした。
それ以降、時間範囲0〜60秒間の2次元円柱の周りの流れについて、種々のパラメータを変えてシミュレーションしたので、その結果をここでまとめる。
情報源
- Physics-Informed Neural Networks for Low Reynolds Number Flows over Cylinder - この論文の計算領域を参考に進めた。壁の境界条件は、Figure 4.の説明文に「the freestream baoundary condition of 1 m/s」とあった。Figure 9.の図と共に、隠れ層のレイア数についての記述も参考になった。ソースコードは無いが、流体の支配方程式の説明を読む限りVP型で解いているようだ。Figure 2.の全体像のInputには、時間$t$の記述はあるが、時間軸は無い。
- Experience report of physics-informed neural networks in fluid simulations: pitfalls and frustration - この論文の境界条件、隠れ層のノード数、レイア(層)数について参考にした。なお、この論文は、少し前に投稿したOpenFOAMによるカルマン渦の情報源1.と同じ筆者で、そのペーパーより約1年前に書かれたもの。
- Vortex shedding by Joel Guerrero 2D - このページに「2D Circular cylinder - Vortex shedding」というチュートリアルがある。初めは、このチュートリアルの計算領域に合わせて、PINNsでシミュレーションした。このページについては、OpenFOAMによるカルマン渦との投稿の情報源6.で紹介している。
- PINN工夫まとめ - PINNで学習が上手くいかない時のヒントとなる資料へのリンク。ここを起点として、「failure mode」について色々と調べた。
経緯
次のような経緯でパラメータを変更した。結果の判断基準は、速度場/圧力場の時間経緯を見て、自然なものを感性で判断。OpenFOAMの出力などと比較すべきであったが、今回はそこまで出来なかった。
1. 計算領域の変更
最初は、シミュレーション結果を比較するために、OpenFOAMの情報源6.のチュートリアルの計算領域に合わせて開始した。良い結果は得られず、コードに誤りがあるか確認のために一旦、この投稿での計算領域でシミュレーションを実施した。その結果、ST formでの実施の方が、より良い結果となったので、以降ST formで実行することにした。
計算領域についは、情報源1.に合わせ、円柱の後ろを長く取った。上下の壁はnon-slip条件(u方向、v方向ともにゼロ)とし、OUTLETでの圧力ゼロの境界条件とした。U_max=5(Re=200)の場合は、速度場については、比較的に良い結果が得られたが、圧力場はy方向に傾きのある結果となった。U_max=1(Re=40)の場合は、速度場、圧力場ともに大きく乱れた結果。
上下の壁は、slip条件(u方向は、U_maxの値、v方向はゼロ)とすると、速度場、圧力場、共に比較的良い結果を示した。
2. 隠れ層の変更(隠れ層を増やす)
ST formでシミュレーションした結果、u, v速度成分は、比較的に良い結果を示していたが、円柱前面(INLET側)に伸びていた(私はこれをノーズと呼ぶ)のが気になって、調べていたら、情報源1.の図9.の説明に、「隠れ層が10の場合は、先端部が正確に再現できない」との記述があった。隠れ層を増やすことにした。
3. 収束しないことへの対応
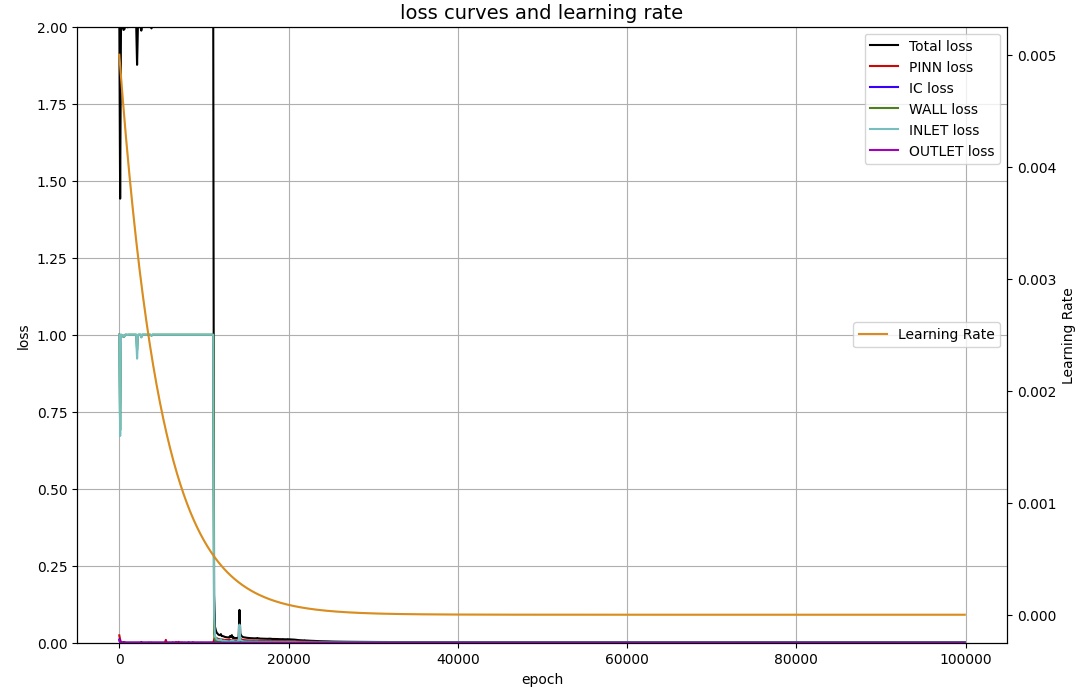
隠れ層を50ノード×13層で実施していたが、50ノード×20層、25層で実施した。そうすると、20,000回ループ(epoch=20000)でも、INLETとWALLの誤差が1.0から動かず、収束しない現象となった。
情報源4.を参考にしながら、誤差(損失項)の重み付け、ネットワークを「xavier」で初期化等の対応策を試行錯誤した。
結果的には、50ノードx25層の隠れ層で、epoch=50000で実行すると、20,000回を過ぎたあたりで、INLETとWALLの誤差は1.0から激減し、収束傾向を示すようになった。そのモデルで推論した結果は、速度場、圧力場共に期待している内容とは異なっていた。特に速度場は、本来v方向に傾いているのだが、u方向に傾いていた。
4. 隠れ層の変更(ノード数を増やす)
50ノードであまりよい結果がえられなかったので、情報源2.を参考に、256ノード/512ノードx6層/8層で試してみた。最終的に、256ノードx8層が一番よい結果となった。
パラメータ
経緯で述べたように、隠れ層、境界条件、計算点(collocation point)、繰り返し回数(epoch)等を色々と変更いたが、以下のコードでは、次のようなパラメータ設定でシミュレーションをおこなった。
collocation pointについては、「問題領域(変数、定数)を設定」部分のコードを参照してほしい。
| パラメータ | 内容 |
|---|---|
| 隠れ層 | 256x256ノード8層 |
| INLET | 1.0 (x方向にU_max=1.0m/sの流れ) |
| WALL(上下の境界) | slip条件(x方向にU_maxの流れ) |
| OUTLET | 圧力ゼロ |
| epoch | 100,000回 |
コード
こちらの投稿と同じ部分もあるが、改めてコードを掲載する。
パッケージをimport
import os
import numpy as np

import torch
import torch.nn as nn
import torch.nn.functional as F
from torch import optim
from torch.optim import lr_scheduler

import matplotlib.pyplot as plt
from matplotlib.colors import Normalize

from pyDOE import lhs  # Latin Hypercube Sampling (LHS)

import subprocess
CUDAを使っていることの確認
# Exit if not run on cuda
if not torch.cuda.is_available():
    print("Exit because of running on cpu\n")
    os._exit(os.EX_OK)
else:
    device = 'cuda'  # device is used later

# We are running on cuda
cmd = "nvidia-smi --query-gpu=name --format=csv,noheader"
output = subprocess.check_output(cmd, shell=True).decode()
output = output.replace("\n", "")
print("Running on", output)
ごく稀にCUDAを認識できずにCPUで実行することがるので、CUDAが認識できなければ、実行を止めるようにした。
関数を定義
# Remove points inside the cylinder from collocation points
#  Find the distance between the center of the cylinder (xc, yc) and a point,
#  and delete anything less than the cylinder radius (r).
def Remove_inCylinder(coor, xc, yc, r):
    distance = np.array([((xy[0] - xc)**2 + (xy[1]-yc)**2)**0.5 for xy in coor])
    return coor[distance > r, :]
レイノルズ数を定義
# Define Re

U_max = 1.0 # flow velocity
mu = 0.0005
rho = 1.0  # Re=200=(uxD)/nu=(1x0.1)/0.0005, nu=mu/rho
問題領域(変数、定数)を定義
# Define variables to represent computation domains

# Some constants
IC_samples = 5000
wall_samples = 1000
cylinder_samples = 5000
inlet_samples = 2000
outlet_samples = 2000

# Domain bounds
xmin = 0.0
ymin = 0.0
tmin = 0.0
xmax = 4.0
ymax = 2.0
tmax = 60.0
lb = np.array([xmin, ymin, tmin])
ub = np.array([xmax, ymax, tmax])

# cylinder
dia = 0.1  # diameter
radi = dia/2.0  # radius
xcent = 1.0  # center in x-axis
ycent = 1.0  # cneter in y-axis

# constants for refinement area and near wall area
xrefmin = 0.5
yrefmin = 0.5
xrefmax = 3.5
yrefmax = 1.5
near_w = 0.2

# Inital Condition:
#  (u, v, p) = (0, 0, 0) at t= 0, x ∈ [xmin, xmax], y ∈ [ymin, ymax]

xy_IC = [xmin, ymin] + [xmax, ymax] * lhs(2, IC_samples)
t_IC = np.zeros((IC_samples, 1))
IC = np.concatenate((xy_IC, t_IC), 1)
IC = Remove_inCylinder(IC, xc=xcent, yc=ycent, r=radi)

# define floor and ceiling, we called wall
#   celling(x,y,t): (xmin, ymin ,tmin)-(xmax, ymax, tmax)
#   floor(x,y,t): (xmin, ymin, tmin)-(xmax, ymin, tmax)
# N.B. we give the constant flow at the wall.
CEILING = [xmin, ymax, tmin] + [xmax, ymin, tmax] * lhs(3, wall_samples)
x_CEILING = CEILING[:, 0:1]
u_CEILING = np.zeros_like(x_CEILING)
u_CEILING.fill(U_max)
v_CEILING = 0 * u_CEILING
CEILING = np.concatenate((CEILING, u_CEILING, v_CEILING), 1)
FLOOR = [xmin, ymin, tmin] + [xmax, ymin, tmax] * lhs(3, wall_samples)
x_FLOOR = FLOOR[:, 0:1]
u_FLOOR = np.zeros_like(x_FLOOR)
u_FLOOR.fill(U_max)
v_FLOOR = 0 * u_FLOOR
FLOOR = np.concatenate((FLOOR, u_FLOOR, v_FLOOR), 1)
WALL = np.concatenate((CEILING, FLOOR), 0)

# Define cylinder surface
rt_CYLD = [0.0, tmin] + [2*np.pi, tmax] * lhs(2, cylinder_samples)
x_CYLD = np.multiply(radi, np.cos(rt_CYLD[:, 0:1])) + xcent
y_CYLD = np.multiply(radi, np.sin(rt_CYLD[:, 0:1])) + ycent
CYLD = np.concatenate((x_CYLD, y_CYLD, rt_CYLD[:, 1:2]), 1)

# Define INLET
INLET = [xmin, ymin, tmin] + [xmin, ymax, tmax] * lhs(3, inlet_samples)
y_INLET = INLET[:, 1:2]
t_INLET = INLET[:, 2:3]
u_INLET = np.zeros_like(y_INLET)
u_INLET.fill(U_max)
v_INLET = np.zeros_like(u_INLET)
INLET = np.concatenate((INLET, u_INLET, v_INLET), 1)

# Define OUTLET
OUTLET = [xmax, ymin, tmin] + [xmin, ymax, tmax] * lhs(3, outlet_samples)

# Define Collocation points, with refinement near the wall
collo_samples = 10000
refine_samples = 5000
near_samples = 2000

"""
xyt_Collo = lb + (ub - lb) * lhs(3, collo_samples)
xyt_refine = [xrefmin, yrefmin, tmin] + [xrefmax-xrefmin, yrefmax-xrefmin, tmax] * lhs(3, refine_samples)
xyt_floor = [xmin, ymin, tmin] + [xmax, near_w, tmax] * lhs(3, near_samples)
xyt_ceiling = [xmin, ymax-near_w, tmin] + [xmax, near_w, tmax] * lhs(3, near_samples)
Collo = np.concatenate((xyt_Collo, xyt_refine, xyt_floor, xyt_ceiling), 0)
"""
collo_samples = 20000
Collo = lb + (ub - lb) * lhs(3, collo_samples)
Collo = Remove_inCylinder(Collo, xc=xcent, yc=ycent, r=radi)
計算領域(Collocation)で、円柱の周りや壁周辺のポイントの効果が疑問だったので、削除した。
collocaion pointを可視化
# Visualize the collocation points in (x, y, t)
fig = plt.figure(figsize=(20,20))

# 2D
ax1 = fig.add_subplot(2, 1, 1)
ax1.set_aspect('equal')
ax1.scatter(Collo[:, 0:1], Collo[:, 1:2], marker='o', color='greenyellow', s=1)
ax1.scatter(IC[:, 0:1], IC[:, 1:2], marker='o', color='magenta', s=1)
ax1.scatter(WALL[:, 0:1], WALL[:, 1:2], marker='o', color= 'orange', s=1)
ax1.scatter(CYLD[:, 0:1], CYLD[:, 1:2], marker='o', color='blue', s=1)
ax1.scatter(OUTLET[:, 0:1], OUTLET[:, 1:2], marker='o', color='gray', s=1)
ax1.scatter(INLET[:, 0:1], INLET[:, 1:2], marker='o', color='red', s=1)
ax1.set_title('Collocation points')
ax1.set_xlabel('x')
ax1.set_ylabel('y')

# 3D
ax2 = fig.add_subplot(2, 1, 2, projection='3d')
#ax2.set_aspect('equal')
ax2.set_box_aspect((2, 2, 1))
ax2.scatter(Collo[:, 0:1], Collo[:, 2:3], Collo[:, 1:2], marker='o', color='greenyellow', s=1)
ax2.scatter(WALL[:, 0:1], WALL[:, 2:3], WALL[:, 1:2], marker='o', color= 'orange', s=1)
ax2.scatter(CYLD[:, 0:1], CYLD[:, 2:3], CYLD[:, 1:2], marker='o', color='blue', s=1)
ax2.scatter(OUTLET[:, 0:1], OUTLET[:, 2:3], OUTLET[:, 1:2], marker='o', color='gray', s=1)
ax2.scatter(INLET[:, 0:1], INLET[:, 2:3], INLET[:, 1:2], marker='o', color='red', s=1)
ax2.set_title('Collocation points')
ax2.set_xlabel('x')
ax2.set_zlabel('y')
ax2.set_ylabel('t')

plt.show()
学習で使う変数をtensor化
# Define collocation, INLET, OUTLET, and WALL variables as torch.tensor
x_c = torch.tensor(Collo[:, 0:1], device=device, dtype=torch.float32)
y_c = torch.tensor(Collo[:, 1:2], device=device, dtype=torch.float32)
t_c = torch.tensor(Collo[:, 2:3], device=device, dtype=torch.float32)

x_IC = torch.tensor(IC[:, 0:1], device=device, dtype=torch.float32)
y_IC = torch.tensor(IC[:, 1:2], device=device, dtype=torch.float32)
t_IC = torch.tensor(IC[:, 2:3], device=device, dtype=torch.float32)

x_INLET = torch.tensor(INLET[:, 0:1], device=device, dtype=torch.float32)
y_INLET = torch.tensor(INLET[:, 1:2], device=device, dtype=torch.float32)
t_INLET = torch.tensor(INLET[:, 2:3], device=device, dtype=torch.float32)
u_INLET = torch.tensor(INLET[:, 3:4], device=device, dtype=torch.float32)
v_INLET = torch.tensor(INLET[:, 4:5], device=device, dtype=torch.float32)

x_OUTLET = torch.tensor(OUTLET[:, 0:1], device=device, dtype=torch.float32)
y_OUTLET = torch.tensor(OUTLET[:, 1:2], device=device, dtype=torch.float32)
t_OUTLET = torch.tensor(OUTLET[:, 2:3], device=device, dtype=torch.float32)


x_WALL = torch.tensor(WALL[:, 0:1], device=device, dtype=torch.float32)
y_WALL = torch.tensor(WALL[:, 1:2], device=device, dtype=torch.float32)
t_WALL = torch.tensor(WALL[:, 2:3], device=device, dtype=torch.float32)
u_WALL = torch.tensor(WALL[:, 3:4], device=device, dtype=torch.float32)
v_WALL = torch.tensor(WALL[:, 4:5], device=device, dtype=torch.float32)

x_CYLD = torch.tensor(CYLD[:, 0:1], device=device, dtype=torch.float32)
y_CYLD = torch.tensor(CYLD[:, 1:2], device=device, dtype=torch.float32)
t_CYLD = torch.tensor(CYLD[:, 2:3], device=device, dtype=torch.float32)
全結合層のネットワーククラスを作成
# define p_NN class

class p_NN(nn.Module):
    def __init__(self, layers):
        super().__init__()
        self.activation = nn.Tanh()
#        self.activation = nn.ReLU()
        self.input_layer = nn.Linear(layers[0], layers[1])
        self.hidden_layers = nn.ModuleList(
            [nn.Linear(layers[i], layers[i+1]) for i in range(1, len(layers)-2)]
        )
        self.output_layer = nn.Linear(layers[-2], layers[-1])
        """
        # xavier initialization
        for i in range(len(self.hidden_layers)):
            nn.init.xavier_normal_(self.hidden_layers[i].weight.data, gain=1.0)
            nn.init.zeros_(self.hidden_layers[i].bias.data)
        """

    def forward(self, x):
        x = self.activation(self.input_layer(x))
        for layer in self.hidden_layers:
            x = self.activation(layer(x))
        x = self.output_layer(x)
        return x

    def neural_net(self, x, y, t):
        inputs = torch.cat([x, y, t], dim=1)
        outputs = self.forward(inputs)
        psi = outputs[:, 0:1]
        p = outputs[:, 1:2]
        s11 = outputs[:, 2:3]
        s22 = outputs[:, 3:4]
        s12 = outputs[:, 4:5]

        return psi, p, s11, s22, s12

    def net_uvp(self, x, y, t):
        x.requires_grad = True
        y.requires_grad = True
        t.requires_grad = True
        psi, p, s11, s22, s12 = self.neural_net(x, y, t)
        u = gradients(psi, y)
        v = -gradients(psi, x)

        return u, v, p, s11, s22, s12

    def net_f(self, x, y, t):
        u, v, p, s11, s22, s12 = self.net_uvp(x, y, t)
        u_x = gradients(u, x)
        u_y = gradients(u, y)
        u_t = gradients(u, t)
        s11_x = gradients(s11, x)
        s12_y = gradients(s12, y)
        fu = rho*u_t + rho*(u*u_x + v*u_y) - (s11_x + s12_y)

        v_x = gradients(v, x)
        v_y = gradients(v, y)
        v_t = gradients(v, t)
        s12_x = gradients(s12, x)
        s22_y = gradients(s22, y)
        fv = rho*v_t + rho*(u*v_x + v*v_y) - (s12_x + s22_y)

        fxx = -p + mu*2.0*u_x - s11
        fyy = -p + mu*2.0*v_y - s22
        fxy = mu*(u_y + v_x) - s12
        fp = p + (s11 + s22)/2.0

        return fu, fv, fxx, fyy, fxy, fp

    def predict(self, x, y, t):  # no tensor is passed, return no tensor
        xx = torch.tensor(x, device=device, dtype=torch.float32)
        yy = torch.tensor(y, device=device, dtype=torch.float32)
        tt = torch.tensor(t, device=device, dtype=torch.float32)
        uu, vv, pp, _, _, _ = self.net_uvp(xx, yy, tt)
        u = uu.to("cpu").detach().numpy()
        v = vv.to("cpu").detach().numpy()
        p = pp.to("cpu").detach().numpy()
        return u, v, p
xavierでネットワークの初期化を試みたが、効果が無かったので、コメントアウトしている。
微分関数を定義
# Differentiation by pytorch
# return dy/dx
def gradients(y, x):
    return torch.autograd.grad(y,
                               x,
                               grad_outputs=torch.ones_like(y),
                               create_graph=True,
                              )[0]
モデルを作成(インスタンス化)
# Create a Model
#  Input: (x, y, t)
#  hidden: 20-layer x 50-node
#  Output: (phi, p, s1, s2, s3)
#uv_layers = [3]+20*[50]+[5]
#uv_layers = [3]+13*[50]+[5]
#uv_layers = [3]+14*[50]+[5]
#uv_layers = [3]+15*[50]+[5]
#uv_layers = [3]+10*[50]+[5]
#uv_layers = [3]+[32]+[64]+[128]+[128]+[64]+[32]+[5]
#uv_layers = [3]+[32]+[64]+[128]+[256]+[256]+[128]+[64]+[32]+[5]
#uv_layers = [3]+15*[60]+[5]

uv_layers = [3]+8*[256]+[5]

model = p_NN(uv_layers).to(device)
print(model)
損失関数、最適化関数を定義
# Loss function: Mean Square Error
loss_func = nn.MSELoss()

# Optimizer: Adam(Adaptive moment estimation)
optimizer = optim.Adam(model.parameters(), lr=0.005)

scheduler = lr_scheduler.ExponentialLR(optimizer, gamma=0.98)
前回同様、loss_func()は使っていない。学習率を変化させる関数を追加。
学習ループの時間計測のためタイマーをスタート
# Measure processing time

import time

start_time = time.time()
学習ループ
# learning Loop

Lamb_iw = 1.0
Lamb_ot = 1.0

num_epoch = 100000  # epoch count

Epoch = []
Learning_rate = []
Loss_fv = []
Loss_fu = []
Loss_fxx = []
Loss_fyy = []
Loss_fxy = []
Loss_fp = []
Loss_PINN = []
Loss_TOTAL = []
Loss_IC = []
Loss_WALL = []
Loss_CYLD = []
Loss_INLET = []
Loss_OUTLET = []

for i in range(num_epoch):
    if i == 0:
        print("Epoch \t Learning-rate \t Loss_Total \t Loss_PINN \t Loss_IC \t Loss_WALL \t Loss_CYLD \t Loss_INLET \t Loss_OUTLET")

    optimizer.zero_grad()
    fu, fv, fxx, fyy, fxy, fp = model.net_f(x_c, y_c, t_c)
    loss_fu = torch.mean(fu**2)
    loss_fv = torch.mean(fv**2)
    loss_fxx = torch.mean(fxx**2)
    loss_fyy = torch.mean(fyy**2)
    loss_fxy = torch.mean(fxy**2)
    loss_fp = torch.mean(fp**2)
    loss_PINN = loss_fu + loss_fv + loss_fxx + loss_fyy + loss_fxy + loss_fp

    u_ic, v_ic, p_ic, _, _, _ = model.net_uvp(x_IC, y_IC, t_IC)
    loss_IC = torch.mean(u_ic**2) + torch.mean(v_ic**2) + torch.mean(p_ic**2)

    u_wall, v_wall, _, _, _, _ = model.net_uvp(x_WALL, y_WALL, t_WALL)
#    loss_WALL = torch.mean(u_wall**2) + torch.mean(v_wall**2)
    loss_WALL = torch.mean((u_wall - u_WALL)**2) + torch.mean((v_wall - v_WALL)**2)

    u_cyld, v_cyld, _, _, _, _ = model.net_uvp(x_CYLD, y_CYLD, t_CYLD)
    loss_CYLD = torch.mean(u_cyld**2) + torch.mean(v_cyld**2)

    u_inlet, v_inlet, _, _, _, _ = model.net_uvp(x_INLET, y_INLET, t_INLET)
    loss_INLET = torch.mean((u_inlet - u_INLET)**2) + torch.mean(v_inlet**2)

    _, _, p_outlet, _, _, _ = model.net_uvp(x_OUTLET, y_OUTLET, t_OUTLET)
    loss_OUTLET = torch.mean(p_outlet**2)
    # Apply zero-gradient condition at OUTLET
#    x_OUTLET.requres_grad = True
#    y_OUTLET.requres_grad = True
#    u_outlet, v_outlet, _, _, _, _ = model.net_uvp(x_OUTLET, y_OUTLET, t_OUTLET)
#    u_outlet_x = gradients(u_outlet, x_OUTLET)
#    v_outlet_x = gradients(v_outlet, x_OUTLET)
#    loss_OUTLET = torch.mean(u_outlet_x**2) + torch.mean(v_outlet_x**2)

    loss_TOTAL = (loss_PINN + loss_IC + loss_CYLD + loss_OUTLET) * Lamb_ot + (loss_WALL + loss_INLET) * Lamb_iw

    loss_TOTAL.backward()
    optimizer.step()

    if i % 100 == 0:
        Epoch.append(i)
        Learning_rate.append(scheduler.get_last_lr()[0])
        Loss_fu.append(loss_fu.detach().cpu().numpy())
        Loss_fv.append(loss_fv.detach().cpu().numpy())
        Loss_fxx.append(loss_fxx.detach().cpu().numpy())
        Loss_fyy.append(loss_fyy.detach().cpu().numpy())
        Loss_fxy.append(loss_fxy.detach().cpu().numpy())
        Loss_fp.append(loss_fp.detach().cpu().numpy())
        Loss_PINN.append(loss_PINN.detach().cpu().numpy())
        Loss_TOTAL.append(loss_TOTAL.detach().cpu().numpy())
        Loss_IC.append(loss_IC.detach().cpu().numpy())
        Loss_WALL.append(loss_WALL.detach().cpu().numpy())
        Loss_CYLD.append(loss_CYLD.detach().cpu().numpy())
        Loss_INLET.append(loss_INLET.detach().cpu().numpy())
        Loss_OUTLET.append(loss_OUTLET.detach().cpu().numpy())

        scheduler.step()

    if i % 1000 == 0:
        print(i, "\t",
              format(scheduler.get_last_lr()[0], ".4E"), "\t",
              format(loss_TOTAL.detach().cpu().numpy(), ".4E"), "\t",
              format(loss_PINN.detach().cpu().numpy(), ".4E"), "\t",
              format(loss_IC.detach().cpu().numpy(), ".4E"), "\t",
              format(loss_WALL.detach().cpu().numpy(), ".4E"), "\t",
              format(loss_CYLD.detach().cpu().numpy(), ".4E"), "\t",
              format(loss_INLET.detach().cpu().numpy(), ".4E"), "\t",
              format(loss_OUTLET.detach().cpu().numpy(), ".4E"), "\t",
             )
壁のnon-slip条件、OUTLETでの速度勾配ゼロはコメントアウト。
学習ループ終了したので、タイマーをストップ
end_time = time.time()
processing_time = end_time - start_time
print("#"*20)
print("processing_time(sec): ", processing_time)
print("#"*20)
損失を可視化
# Draw loss curves

fig, ax1 = plt.subplots(figsize=(12, 8))
ax2 = ax1.twinx()

ax1.plot(Epoch, Loss_TOTAL, c='black', label='Total loss')
ax1.plot(Epoch, Loss_PINN, c='red', label='PINN loss')
ax1.plot(Epoch, Loss_IC, c='b', label='IC loss')
ax1.plot(Epoch, Loss_WALL, c='g', label='WALL loss')
ax1.plot(Epoch, Loss_INLET, c='c', label='INLET loss')
ax1.plot(Epoch, Loss_OUTLET, c='m', label='OUTLET loss')
ax1.set_xlabel('epoch')
ax1.set_ylabel('loss')
ax1.set_ylim([0, 2.0])
ax1.set_title('loss curves and learning rate', fontsize='14')
ax1.grid()
ax1.legend(loc=1)

ax2.plot(Epoch, Learning_rate, c='darkorange', label='Learning Rate')
ax2.set_ylabel('Learning Rate')
ax2.legend(loc=7)

plt.show()
速度場と圧力場を可視化
# File output function

alpha = 1.0
cmap = 'rainbow'
marker= 'o'
s = 20

def make_aFrame(epoch, t, x, y, u, v, p):
    """
    i: frame number: 0-100
    x, y: 2d computational domain
    u, v, p: predicted u, v, p
    """
    fig = plt.figure(figsize=(12,14))
    ax1 = fig.add_subplot(3, 1, 1)
#    norm = Normalize(vmin=0, vmax=1.2)
#    cp = ax1.scatter(x, y, c=u, alpha=alpha, edgecolors='none', cmap=cmap, marker=marker, s=s, norm=norm)
    cp = ax1.scatter(x, y, c=u, alpha=alpha, edgecolors='none', cmap=cmap, marker=marker, s=s)
    fig.colorbar(cp)
    ax1.set_xlim([xmin, xmax])
    ax1.set_ylim([ymin, ymax])
    ax1.set_title('u(m/s)  at {:07.03f}s'.format(t))
    ax1.set_xlabel('x')
    ax1.set_ylabel('y')
    ax1.set_aspect('equal')

#    norm = Normalize(vmin=-0.6, vmax=0.6)
    ax2 = fig.add_subplot(3, 1, 2)
#    cp = ax2.scatter(x, y, c=v, alpha=alpha, edgecolors='none', cmap=cmap, marker='o', s=s, norm=norm)
    cp = ax2.scatter(x, y, c=v, alpha=alpha, edgecolors='none', cmap=cmap, marker='o', s=s)
    fig.colorbar(cp)
    ax2.set_xlim([xmin, xmax])
    ax2.set_ylim([ymin, ymax])
    ax2.set_title('v(m/s)  at {:07.03f}s'.format(t))
    ax2.set_xlabel('x')
    ax2.set_ylabel('y')
    ax2.set_aspect('equal')

#    norm = Normalize(vmin=0, vmax=2.5)
    ax3 = fig.add_subplot(3, 1, 3)
#    cp = ax3.scatter(x, y, c=p, alpha=alpha, edgecolors='none', cmap=cmap, marker='o', s=s, norm=norm)
    cp = ax3.scatter(x, y, c=p, alpha=alpha, edgecolors='none', cmap=cmap, marker='o', s=s)
    fig.colorbar(cp)
    ax3.set_xlim([xmin, xmax])
    ax3.set_ylim([ymin, ymax])
    ax3.set_title('Pressure(pa)  at {:07.03f}s'.format(t))
    ax3.set_xlabel('x')
    ax3.set_ylabel('y')
    ax3.set_aspect('equal')

    plt.suptitle('Speed and Pressure field at Epoch:{:06} Time:{:07.03f}s'.format(epoch, t), fontsize=16)

    plt.tight_layout

    fig.savefig('./output/uvp_{:06}_{:07.03f}.png'.format(epoch,t), dpi=100)
    plt.close(fig)
def output_uvp(epoch):
    # Output u, v, p at each time step
    x_collo = np.linspace(xmin, xmax, 500)
    y_collo = np.linspace(ymin, ymax, 400)
    x_collo, y_collo = np.meshgrid(x_collo, y_collo)
    x_collo = x_collo.flatten()[:, None]
    y_collo = y_collo.flatten()[:, None]

    # Remove cylinder internals
    dst = ((x_collo - xcent)**2 + (y_collo - ycent)**2)**0.5
    x_collo = x_collo[dst >= radi].flatten()[:, None]
    y_collo = y_collo[dst >= radi].flatten()[:, None]

    x_collo = x_collo.flatten()[:, None]
    y_collo = y_collo.flatten()[:, None]
    t_collo = np.zeros((x_collo.size, 1))

    # Time step loop
    count = 0
    for tt in np.arange(tmin, tmax+(tmax-tmin)/100, (tmax-tmin)/100):
        if count%2 == 0:
            t_collo.fill(tt)
            u_pred, v_pred, p_pred = model.predict(x_collo, y_collo, t_collo)
            make_aFrame(epoch, tt, x_collo, y_collo, u_pred, v_pred, p_pred)
        count += 1
円柱の周りの3点の圧力を可視化
def output_pressures(epoch):
    # Predict the time evolution of pressure
    # at the pressure measurement point (virtual pressure probe)
    t_probe = np.linspace(tmin, tmax, 100)
    x1 = np.zeros_like(t_probe)
    x2 = np.zeros_like(t_probe)
    x3 = np.zeros_like(t_probe)
    x1.fill(xcent-radi)
    x2.fill(xcent)
    x3.fill(xcent+radi)
    y1 = np.zeros_like(t_probe)
    y2 = np.zeros_like(t_probe)
    y3 = np.zeros_like(t_probe)
    y1.fill(ycent)
    y2.fill(ycent+radi)
    y3.fill(ycent)
    x1 = x1.flatten()[:, None]
    x2 = x2.flatten()[:, None]
    x3 = x3.flatten()[:, None]
    y1 = y1.flatten()[:, None]
    y2 = y2.flatten()[:, None]
    y3 = y3.flatten()[:, None]
    t_probe = t_probe.flatten()[:, None]

    _, _, p1 = model.predict(x1, y1, t_probe)
    _, _, p2 = model.predict(x2, y2, t_probe)
    _, _, p3 = model.predict(x3, y3, t_probe)

    fig = plt.figure(figsize=(12,4))

    ax1 = fig.add_subplot(1, 3, 1)
    ax1.plot(t_probe, p1, c='b', label='at P1(front-end of cylinder)')
#    ax1.set_ylim([-0.5, 2.5])
    ax1.set_xlabel('Time(s)')
    ax1.set_ylabel('Pressure(Pa)')
    ax1.grid()
    ax1.legend()

    ax2 = fig.add_subplot(1, 3, 2)
    ax2.plot(t_probe, p2, c='b', label='at P2(upper-end of cylinder)')
#    ax2.set_ylim([-0.5, 2.5])
    ax2.set_xlabel('Time(s)')
    ax2.set_ylabel('Pressure(Pa)')
    ax2.grid()
    ax2.legend()

    ax3 = fig.add_subplot(1, 3, 3)
    ax3.plot(t_probe, p3, c='b', label='at P3(back-end of cylinder)')
#    ax3.set_ylim([-0.5, 2.5])
    ax3.set_xlabel('Time(s)')
    ax3.set_ylabel('Pressure(Pa)')
    ax3.grid()
    ax3.legend()

    fig.suptitle('Pressure time histories at Epoch:{:06}'.format(epoch))
    plt.tight_layout

    fig.savefig('./output/pressure_{:06}.png'.format(epoch), dpi=100)
    plt.close(fig)
可視化関数を呼び出す
# output the currnet state of p_NET()
os.makedirs('./output')
output_pressures(num_epoch)
output_uvp(num_epoch)
可視化
学習状況

上のグラフからも分かるように、4000から11000エポックまで、WALLとINLETの誤差が1.0に留まったままとなっている。この現象は、隠れ層が深くなると(例えば50ノード・25層で)、20000エポックを過ぎても収束傾向が見られなかった。
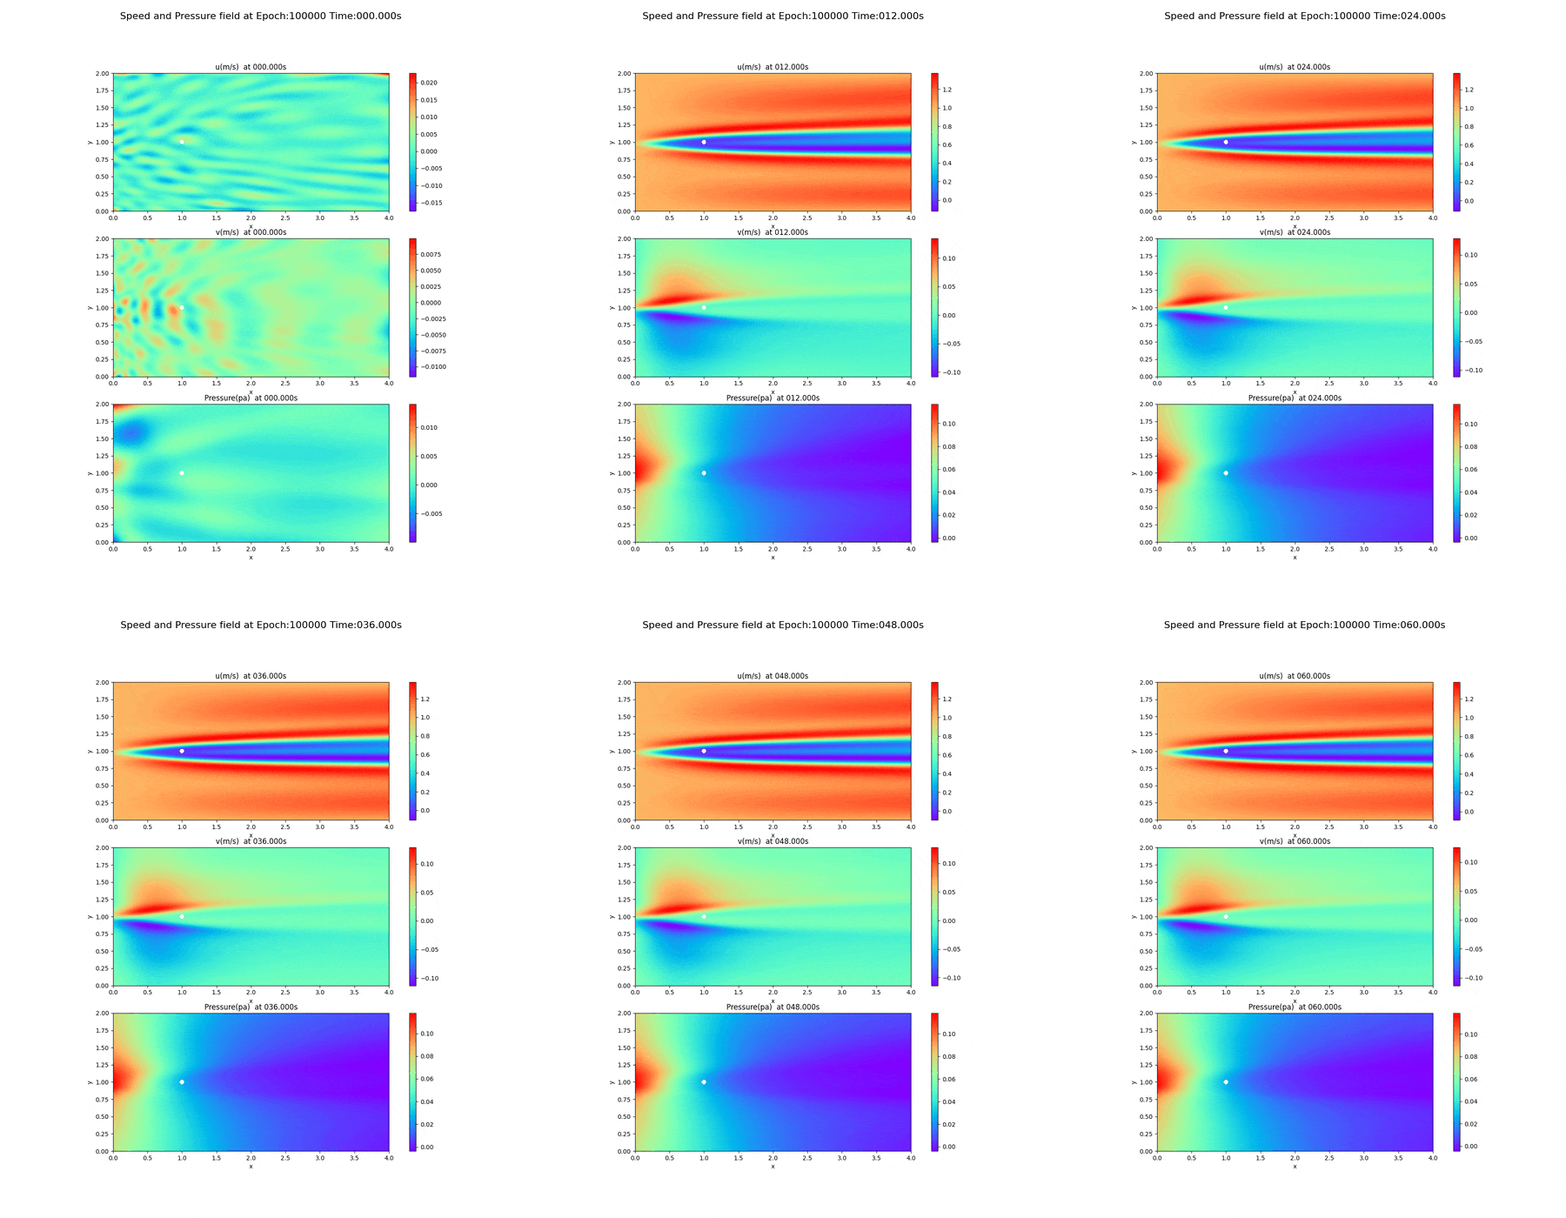
100,000回実行後の速度場・圧力場
epoch=100000で実行した、速度場、圧力場のpngファイルを動画(gifファイル)したのがこれである。(オリジナルは13.8MBだったので、サイズを小さくし圧縮したもの)

100,000回未満の速度場・圧力場
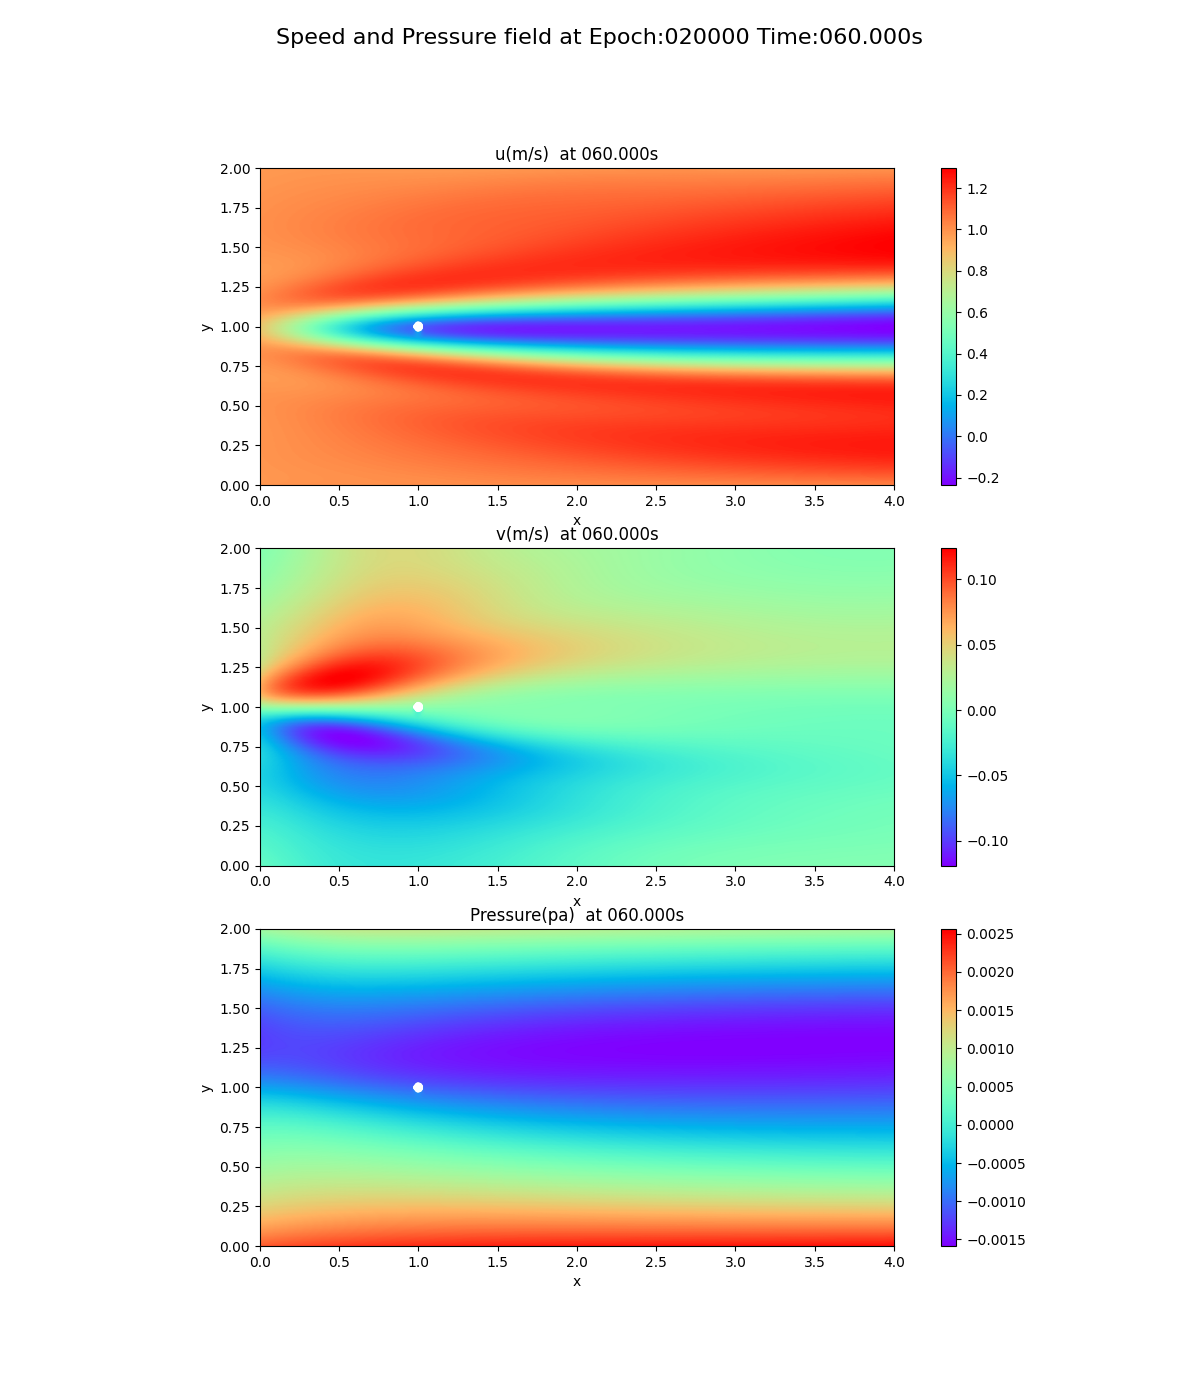
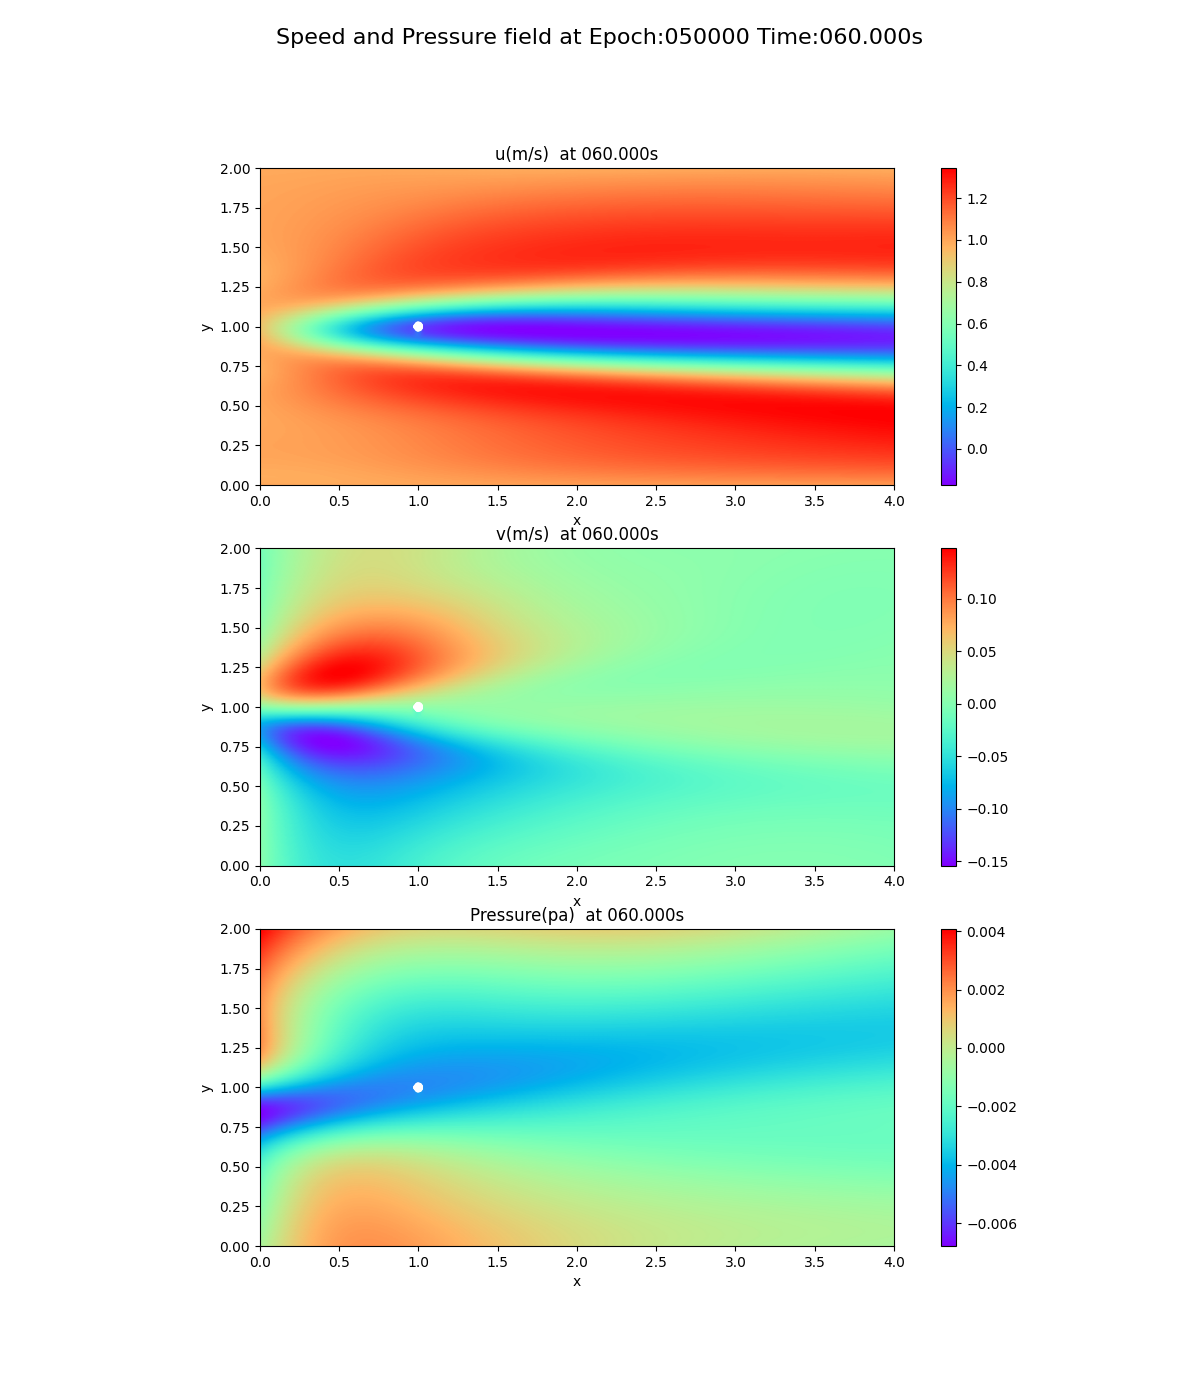
誤差曲線から分かるとおり、20,000回を過ぎた辺りで、誤差が収束しているように見えたので、20,000回、50,000回で学習した結果が次のとおり。シミュレーションの最後(60秒後)のスナップショットである。
20,000回

50,000回

圧力場に注目してほしい。圧力場の傾き(勾配)は、x軸方向に向かって0に近づいていくのだが、20,000回、50,000回ではその傾向が見られない。
まとめ
円柱の周りの2次元流を課題とした理由は、円柱の後ろにカルマン渦(vortex shedding)を見たかったのだが、OpenFOAMによるカルマン渦で紹介したとおり、PINNsでは渦はできないと知った。そうであるならば、今後の研究を調べフォローするため、渦はできないまでも、PINNsでのシミュレーション環境(コード)を構築しようと思っていた。
自分のシミュレーション結果は、OpenFoamの渦発生より時間的に前の流れと比べると、円柱前面(INLET方向)のノーズが出来ることが課題である。隠れ層を増やしても改善されず、収束困難性を示す傾向となった。
また、誤差曲線で収束したように見えても、圧力場は期待通りの結果を示すまでにはepoch回数を大きく増やす必要があることが分かった。
今回、ネット上で色々と関連情報を調べる上で、PerplexityとnotebookLMが非常に役に立った。Perplexityは、ネット上から調べたいペーパーなどにアクセスする斥候的な役割、notebookLMはペーパーの内容の概要を知り、更には詳細を調べる参謀的な役割と切り分けて使った。notebookLMは英語のペーパーの内容を理解する時間を1桁以上縮める効果があったと思う。